What is needed:
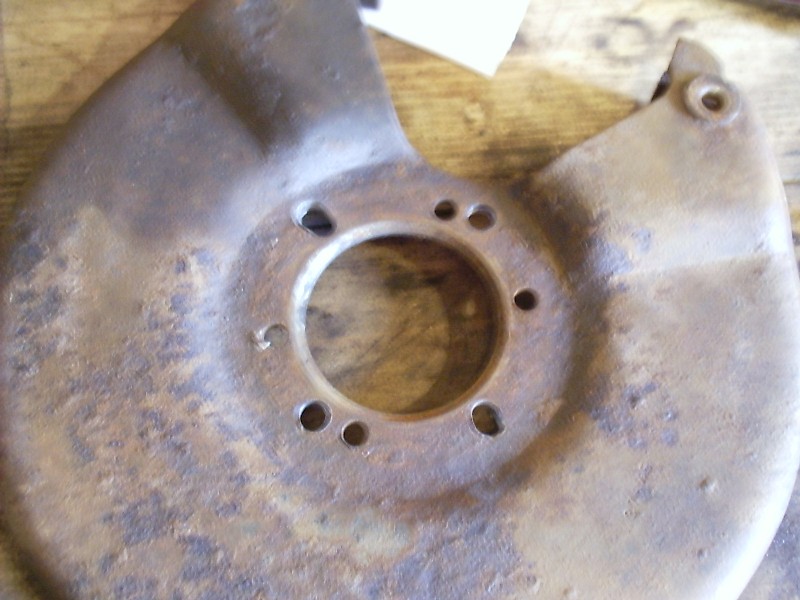
1. Backing plates from any 6 lug 4x4 since the second generation of the Dana 44. There appears to be three kinds. There are the all stamped steel ones, the stamped steel with sheetmetal splashguards, and stamped steel ones with splashguards with locator tabs. Get them from a junkyard and get two junk calipers for cores while preferably getting the caliper bolts too so you don't have to buy new ones.
2. Two new calipers for whatever year your vehicle is. Advance Auto has metric banjo bolt 1/2 ton 4x4 calipers for $15.47 plus $15 core. Napa has them for $13.99 plus a $35 core.
3. A set of pads for whatever year your truck is. #52 pads can be had at Advance Auto for around $17.
4. Stamped-steel center section rotors for a 89 longbox standard cab 4x4. AutoZone has them for around $26. The cast center ones are too thick. Extended cab ones won't work because the rotor is thicker.
5. Brake hoses off the front of a early to mid eighties GM G-body (86 Monte Carlo ones work). Napa #4136847 is $11.49. Tru-Torque H36847.
6. A 3.5" hole saw and arbor to fit it.
7. A 3/8" drill to power the above hole saw.
8. Some kind of grinding device. An air rotary tool is preferred but an angle grinder or even a bench grinder will probably suffice.
9. A foot or two of hot water 1/2" PVC if you are paranoid.
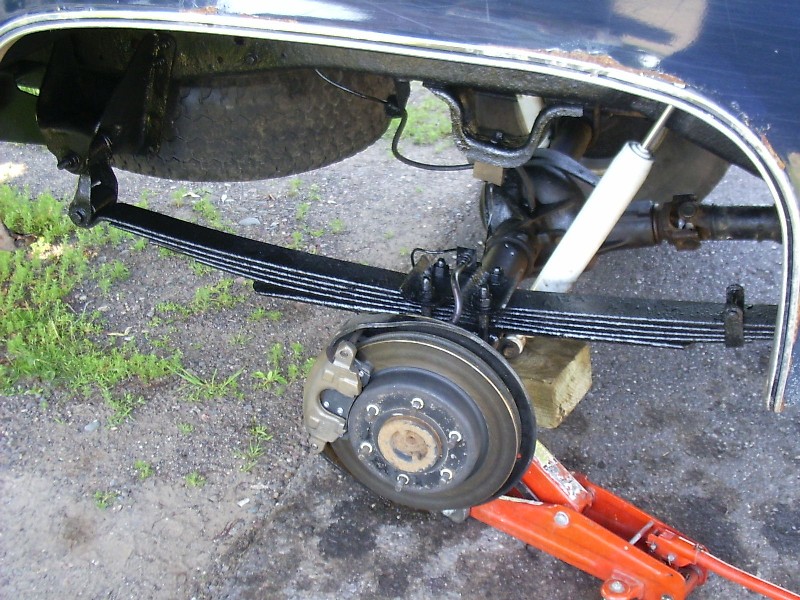
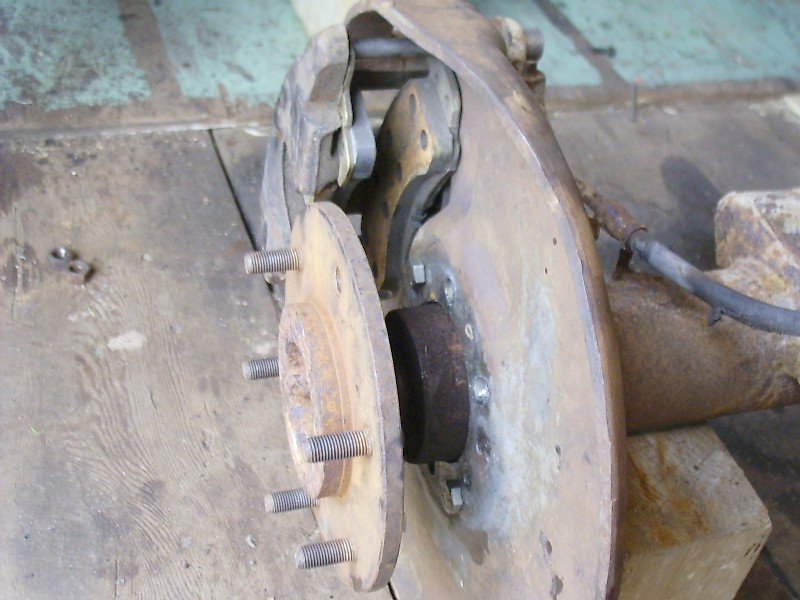
OK, so now that you've got all your ducks in a row you need to modify the backing plates. First, clean them so they're all pretty. There is a mushroom shaped thing to protect the seals on the front of the axle. You can either keep this and deal with it in your way or chisel it off. It'd be nice to have it to protect the rear axle oil seals but it isn't needed. You'll find that the rotor is pretty close to the backing plate when it is all said and done.
You need to slot out two existing holes in the backing plate and make two new ones to fit the flange on the rear axle. I did the first one I made with a drill press and a dremel tool. The second one I made I used a die grinder with a carbide burr which made things much prettier and easier. Keep test fitting it until it centers around the axle tube.
You can either put the calipers on so they are on the back of the axle or on the front. I prefer the back so it looks factory. No matter what, you don't want to have to bleed your brakes with a block of wood in the caliper like a lot of those rear disc kits do with the caliper mounted at the top. I recommend grade 5 bolts and grade 8 nuts and washers. Grade 8 stuff doesn't rust but you want some parts that'll bend before they break. Grade 8 stuff just breaks. The stock stuff seems to be grade 5 fine thread metric anyway. I put the nuts facing the rotors because that way rust has to work a little harder. The grade 5 stuff you will be able to break with an impact if it rusts in place anyway. Do I have a torque? Nope. Just as tight as you can get it with a 3/8" ratchet. Now you can put your axle shafts back in.

Now you've got the worst part of the job to do. It is cutting the rotor. The best way I found was to use a jig to hold the pilot drill in place. It involved drilling three precisely placed holes in a 1" wide piece of flat stock. You bolt the piece of flat stock inside of the hat using the lug holes. You make sure it is centered perfectly. You then drill it out with the hole saw. It isn't a fun job because you're cutting the flared lip on the rotor. The hole in the rotor is 3 1/8" and you're trying to cut a 3.5" outside diameter hole. It is not a lot of fun. If you have access to a drill press with a big enough table to fit a rotor in you'll probably roll your eyes at me saying it was cake. My drillpress is about an inch too small.
Take your die grinder, or any rotary tool, and remove the sharp stuff.
Stick the rotor on there and see how good you were at centering the hole. The first two I cut were perfect and the third one I cut wasn't. You'll get to see the redneck waterpipe fix later.
Now put the caliper with pads on there to see how things fit. If the caliper doesn't seem to want to fit on there make sure there is clearance between it and the backing plate. I found that one of the calipers I got had a locating ear for casting that barely rubbed on the backing plate. Grind out the backing plate so the flat part of the body of the caliper can go all the way to the backing plate.
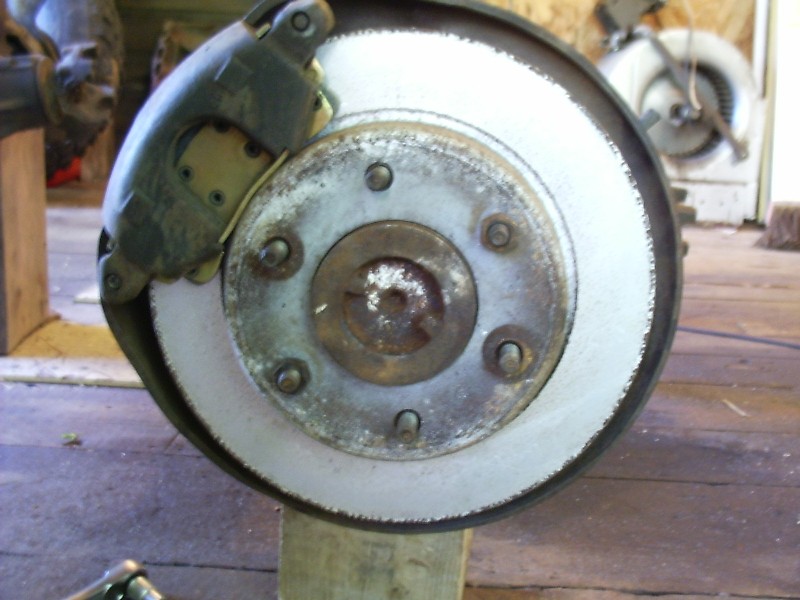
You probably just found out that the pads rub on the rotor. Never fear, grinding to the rescue. You only need about 1/16" so it doesn't take much grinding. It can even be done with a bench grinder. I used a die grinder.
Keep test fitting until you get a 1/16" and then bolt on the calipers with both bads in there. Bend the ears that hold the pads in like you're supposed to. Most people don't and this lets the pad slop around and usually causes squealing and cracked pads. In our case it'll cause the pad to bounce off the rotor as well. Yank the calipers and rotors back off.
Cut some 1/2" hot water applicable PVC into thin slices. Beat them into the lug holes on the rotors with a plastic hammer. If you didn't get your center hole perfect this will resolve it.
Reassemble and then put your brake hoses on. I'm not going to say what the right way is to mount them or anything because I never came up with a perfect solution. I ended up going with what was easiest (read: not essentially best) method. Have fun bleeding the brakes.